A chocolate sponge with chocolate spread, biscuit crumb ‘dirt’ & white chocolate dinosaur fossils is the perfect birthday cake for your budding palaeontologist!
My daughter Kipper is obsessed by dinosaurs and fossils, so it was no surprise when she asked for a dinosaur theme for her recent birthday party. While I’m not bad at baking a cake, decoration is another kettle of fish entirely. I was starting to get more than a little nervous at the prospect of having to sculpt a stegosaurus out of sugar-paste to make her a dinosaur birthday cake…
I needed something simple instead. A cake that could be put together fairly quickly. That didn’t require a piping bag. Something fool-proof.
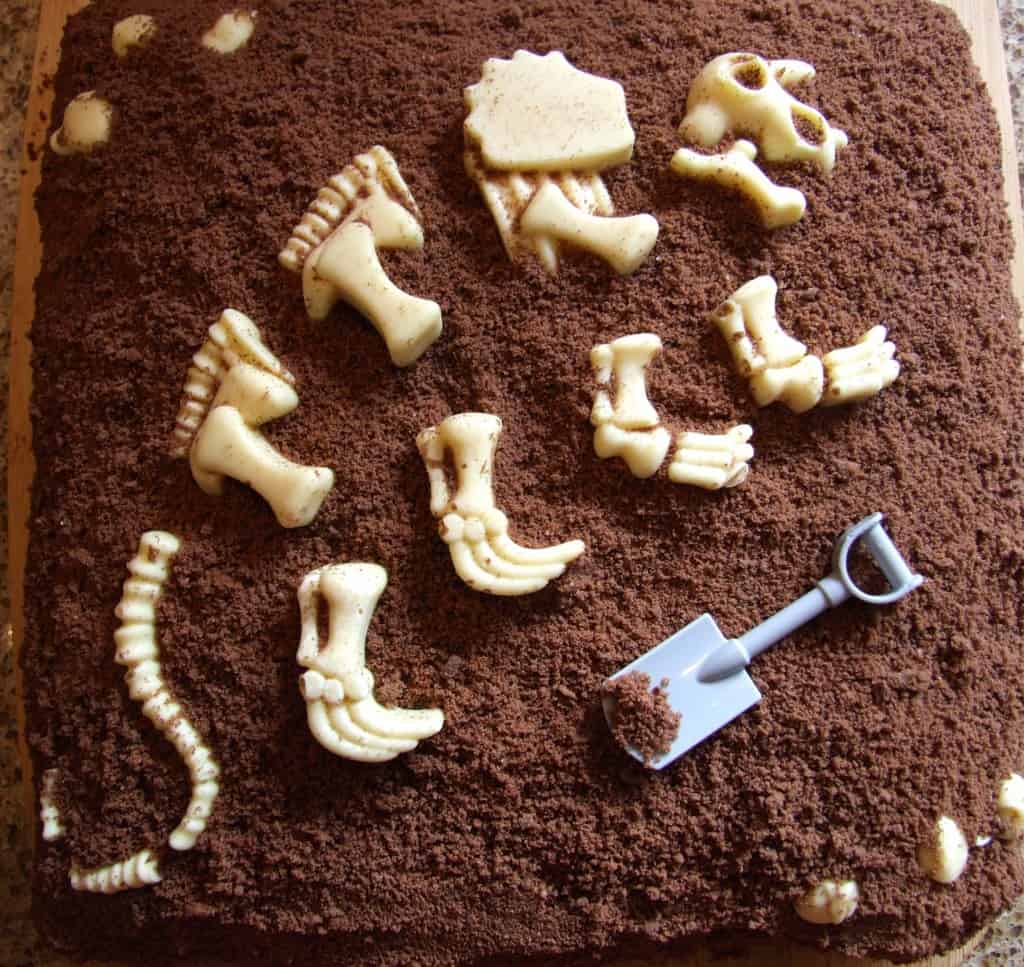
Something like an easy chocolate sponge cake, say, covered in chocolate spread and biscuit crumb ‘dirt’, with white chocolate dinosaur ‘fossils’ arranged on top. And the spade from Kipper’s duplo, just for decoration. Behold, the dinosaur fossil excavation cake!
DIY fossils
The white chocolate fossils were cast using a silicon fossil ice-cube mould![]() . I made two sets of fossils, starting a couple of days ahead of the party, and kept them in the fridge till required. In the end, I didn’t quite use all the pieces, but our dino did get some extra body parts, just to make sure there were enough bits to go around.
. I made two sets of fossils, starting a couple of days ahead of the party, and kept them in the fridge till required. In the end, I didn’t quite use all the pieces, but our dino did get some extra body parts, just to make sure there were enough bits to go around.
We served the dinosaur fossil cake as dessert at the party, with some fresh fruit and squirty cream. Kipper’s friends and their parents all seemed to enjoy it. And most importantly, the dino-obsessed birthday girl loved it!
Makes 1 25cm (approx 10 inch) square cake. (I used my adjustable cake tin![]() – super handy and space-saving in storage!)
– super handy and space-saving in storage!)

Want deliciously easy, family-friendly recipes like this one delivered straight to your inbox? Click here to sign up. (Of course, I’ll never pass on your email address to anyone.)
📖 Recipe
Dinosaur fossil excavation birthday cake
Ingredients
For the cake
- 300 g self-raising flour (1¾ cups + 2 tbsp)
- 50 g cocoa (approx. ½ cup)
- 350 g soft butter or margarine (approx. 1½ cups)
- 350 g caster sugar (approx. 1¾ cups)
- 6 eggs
- 1½ teaspoon vanilla extract
To decorate
- 325 g jar dark chocolate spread (approx. 11½ oz)
- 7-8 bourbon biscuits or similar cream-filled chocolate biscuits
- 200 g white chocolate fossils - see note (approx. 7 oz)
Instructions
- Preheat the oven to 180°C (350°F). Line a 25cm (10 inch) square tin with baking parchment.
- Sift the flour and cocoa together and set aside.
- Cream the butter/margarine with the sugar until light and fluffy. In a jug, beat the eggs together with the vanilla.
- Add the beaten eggs to the butter mixture a little at a time, adding a tablespoon of the flour/cocoa mixture with each addition. Beat thoroughly to combine. If the mixture appears to be curdling, add a little more flour.
- Once all the eggs are incorporated, fold in the remaining flour/cocoa and mix well to ensure everything is well combined. The mixture should be a soft, dropping consistency - if necessary, add a little water or milk.
- Pour the mixture into the prepared tin and tap to level. Bake in the preheated oven for around 30 minutes, or until a toothpick inserted into the centre of the cake comes out clean.
- Remove from the oven and allow to cool to room temperature before decorating.
To decorate
- If the surface of your cake is uneven, you may wish to level it using a breadknife or similar. Otherwise, continue with your cake intact.
- Spread the chocolate spread in a generous layer over the top and sides of the cake. (You may not need the entire jar.)
- Place the biscuits into a food processor or mini chopper, and blitz to crumbs. (Alternatively put them in a plastic bag and pulverise them with a rolling pin.) Gently stick some of the crumbs to the sides of the cake.
- Once the sides are crumbed, arrange the white chocolate fossils on the top of the cake. Sprinkle the remaining biscuit crumbs around and over the fossils to cover the rest of the cake. Brush any excess crumbs off the fossils if necessary.
- If you have a toy spade or any other non-edible 'accessories', place on the cake to complete the scene.
- Store in the fridge until it's time to light the candles and serve!
Notes
Nutrition
I’m sharing this recipe with CookBlogShare!


Jo Hutchinson
This looks so clever and very effective.
Helen
Thanks Jo!
Paul Gittins
The cake looks absolutely fantastic and it’s such a clever idea. But please please point out that melting white chocolate to a pouring consistency is NOT simple or easy. If you use the wrong white chocolate it won’t melt. If you overheat it even slightly, it seizes and you cannot bring it back. If you try to add any liquid, it seizes. I ended up pushing white flower paste into the moulds and waiting until they hardened, after ruining 3 lots of white chocolate. :-/
Helen
Hi Paul, so sorry you had a hard time with the white chocolate. You’re right, it does need to be treated more gently than ‘regular’ chocolate. It’s best to melt it in a bowl over a pan of barely simmering water, and not in the microwave, so you have more control and can remove it from the heat easily. If possible, take it off the heat before it’s all completely melted, and then stir until the last few lumps melt from the residual heat. If it seizes, you can sometimes rescue it by whisking in a little bit of butter or vegetable oil, but this doesn’t always work. I’m glad you were able to find a solution though and I’m sure your cake looked awesome!
lpater2015
What a fun idea. My grand kids love anything dinosaurs.
Helen
I think all kids love dinosaurs! I’ve certainly never met one who wasn’t at least a bit interested.
hijackedbytwins
Wow this looks fab and what a great idea. Thank you for sharing with #CookBlogShare x
Helen
My pleasure – thanks for organising!
Feeding Finn
This is a great idea, my nephew would love this. It is his birthday this week – I’ll share this page with my sister x
Helen
Thanks! Happy birthday to your nephew – I hope he has a ROARING time 😀
Charlotte Oates
My eldest is really into dinosaurs at the moment. It’s not his birthday until August but I think I might have a go at some fossil cupcakes as a treat for him in the meantime – he’d absolutely love them.
Thanks for sharing – such a great idea x
chopstickchronicles@gmail.com
What a fantastic idea!! Kids will have double fun excavating and eating!! I want one too.
Marvellina Goh
This is totally cute !!! what a great idea
Ali @ Home & Plate
This is such a darling birthday cake for any archaeologist in training. Perfect for any kiddo wanting to have a Jurassic party.
Helen
Thanks Ali! Now you’ve put it that way I can think of a few ‘big kids’ who might enjoy this cake, too 😉
Bonnie Kaull
Such a fun idea! I bet the kids loved it!
Helen
Thanks Bonnie. I think they did – it disappeared quickly enough!
Kavey
Absolutely lovely idea, looks really good and I bet it was fun uncovering the dinosaur fossil a bit more before slicing and eating the cake!
Helen
Thanks Kavey. We certainly had fun eating it!
Urvashi Roe
Ha Ha! Brilliant idea. My little nephew will LOVE this!
Helen
Thanks Urvashi. I hope he does 🙂
Dannii @ Hungry Healthy Happy
What a cute cake! I can’t wait to have kids to make them fun birthday cakes like this.
Helen
Thanks Dannii. I hate doing icing, but this was actually really fun 🙂